Building a QMK/Vial firmware from scratch
This guide assumes you have the QMK CLI installed and have forked your own qmk-vial repository.
0. Environment #
Windows
You will have QMK MSYS installed. What you need to do is point MSYS to your Vial fork rather than the QMK one. You can use qmk setup -H <YOUR PATH HERE> to do this. For example: qmk setup -H /d/Code/vial-qmk. It doesn’t like the colons, but the path will be correct when you hit enter.
Mac
Install the QMK CLI tools, then inside your IDE or Terminal of choice: Point QMK to your Vial fork rather than the QMK one. You can use qmk setup -H <YOUR PATH HERE> to do this. For example: qmk setup -H /d/Code/vial-qmk.
1. Create new keyboard #
I opt for opening the vial-qmk folder in VS Code and then using the terminal there, you can do as you please.
To make a new keyboard, you can use qmk new-keyboard, this will as you for a keyboard name. this can be whatever you want, but its good practice to put all your builds under a named folder. Most go for their GitHub usename. I will call this example fleetline, so for the name I put lukevanlukevan/fleetline.
Then it will ask a few things around names and usernames, fairly self explanatory.
When you get to the base layout question, this is where it can really help you. For this example, I selected ortho_4x12. The reason this is helpful is you’ll get a few pre generated files that will make the whole process a bit faster.
Next is “What powers your project?” mine is a ProMicro, so I select that. If you are unsure, there are many places to find out. Googling your microcontroller will yeild answers.
2. Building the matrix #
If you have already built the board and just want to create a firmware for it, or if you’re pre-planning, it’s now time to build the layout in Keyboard Layout Editor. Since I am building an ortho 4x12, I will click “Preset” at the top left and select “Planck”.
If you need to build your layout, do so now.
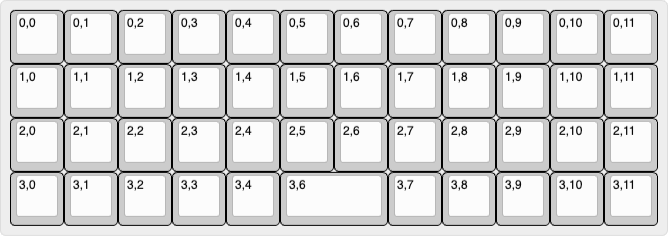
Now it is time to assign the matrix values to the keys. Click on the “Tools” tab and remove all legends. This step is crucial for Vial to know how to relate the real world position of our keys to the matrix position. For each key, write in the top left legend slot: row,col. These values correlate to the row number and column number of the switch in the matrix, for example 0,4 being the switch attached to row 0 and column 4.
Now that you have the matrix setup, go to the keymaps folder for you board and duplicate the default folder. Rename this to vial. With QMK (and Vial) all of the parent files like config.h etc. can be overuled if they exist in the keymap folder. In this case, I will duplicate the files config.h and rules.mk.
vial.json
Now, in the vial keymap folder, make a new file called vial.json. In here, the standard format is:
{
	"matrix": {
		"rows": 4,
		"cols": 12
	},
	"layouts": {
		"keymap": [
			//your matrix here
		]
	}
}
Adjust the rows and cols to suit your build. Hop back to KLE and go to the raw data tab. You have 2 options: copy and paste this data from here, or click “Download JSON” in the bottom right corner. With this data, we can paste it in the vial.json file where I wrote //matrix here. If you copied the data, you will need to put a pair of " around all the text bits, eg x, y, w, etc.
My final layout was as follows:
{
	"matrix": {
		"rows": 4,
		"cols": 12
	},
	"layouts": {
		"keymap": [
			[
				"0,0",
				"0,1",
				"0,2",
				"0,3",
				"0,4",
				"0,5",
				"0,6",
				"0,7",
				"0,8",
				"0,9",
				"0,10",
				"0,11"
			],
			[
				"1,0",
				"1,1",
				"1,2",
				"1,3",
				"1,4",
				"1,5",
				"1,6",
				"1,7",
				"1,8",
				"1,9",
				"1,10",
				"1,11"
			],
			[
				"2,0",
				"2,1",
				"2,2",
				"2,3",
				"2,4",
				"2,5",
				"2,6",
				"2,7",
				"2,8",
				"2,9",
				"2,10",
				"2,11"
			],
			[
				"3,0",
				"3,1",
				"3,2",
				"3,3",
				"3,4",
				{ "w": 2 },
				"3,6",
				"3,7",
				"3,8",
				"3,9",
				"3,10",
				"3,11"
			]
		]
	}
}
With the matrix positions aligned, you can now go to your main info.json (the one in the keyboard folder). In my case, I have a 2u key in the bottom row, and youll notice the column values skip one, it goes from 3,4 to 3,6. Again, this is a correlation to the matrix wiring.
info.json
Now that you have a clear layout of your matrix, you can now make the needed changes to the info.json in the keyboard folder.
Set up the matrix here so that it lines up to the matrix you will have soldered. For reference, here is mine:
{
	"manufacturer": "Luke Van",
	"keyboard_name": "Fleetline",
	"maintainer": "lukevanlukevan",
	"bootloader": "caterina",
	"diode_direction": "COL2ROW",
	"features": {
		"bootmagic": true,
		"command": false,
		"console": false,
		"extrakey": true,
		"mousekey": true,
		"nkro": true
	},
	"matrix_pins": {
		"cols": [
			"C2",
			"C2",
			"C2",
			"C2",
			"C2",
			"C2",
			"C2",
			"C2",
			"C2",
			"C2",
			"C2",
			"C2"
		],
		"rows": ["D1", "D1", "D1", "D1"]
	},
	"processor": "atmega32u4",
	"url": "",
	"usb": {
		"device_version": "1.0.0",
		"pid": "0x0000",
		"vid": "0xFEED"
	},
	"layouts": {
		"LAYOUT_ortho_4x12": {
			"layout": [
				{ "matrix": [0, 0], "x": 0, "y": 0 },
				{ "matrix": [0, 1], "x": 1, "y": 0 },
				{ "matrix": [0, 2], "x": 2, "y": 0 },
				{ "matrix": [0, 3], "x": 3, "y": 0 },
				{ "matrix": [0, 4], "x": 4, "y": 0 },
				{ "matrix": [0, 5], "x": 5, "y": 0 },
				{ "matrix": [0, 6], "x": 6, "y": 0 },
				{ "matrix": [0, 7], "x": 7, "y": 0 },
				{ "matrix": [0, 8], "x": 8, "y": 0 },
				{ "matrix": [0, 9], "x": 9, "y": 0 },
				{ "matrix": [0, 10], "x": 10, "y": 0 },
				{ "matrix": [0, 11], "x": 11, "y": 0 },
				{ "matrix": [1, 0], "x": 0, "y": 1 },
				{ "matrix": [1, 1], "x": 1, "y": 1 },
				{ "matrix": [1, 2], "x": 2, "y": 1 },
				{ "matrix": [1, 3], "x": 3, "y": 1 },
				{ "matrix": [1, 4], "x": 4, "y": 1 },
				{ "matrix": [1, 5], "x": 5, "y": 1 },
				{ "matrix": [1, 6], "x": 6, "y": 1 },
				{ "matrix": [1, 7], "x": 7 "y": 1 },
				{ "matrix": [1, 8], "x": 8, "y": 1 },
				{ "matrix": [1, 9], "x": 9, "y": 1 },
				{ "matrix": [1, 10], "x": 10, "y": 1 },
				{ "matrix": [1, 11], "x": 11, "y": 1 },
				{ "matrix": [2, 0], "x": 0, "y": 2 },
				{ "matrix": [2, 1], "x": 1, "y": 2 },
				{ "matrix": [2, 2], "x": 2, "y": 2 },
				{ "matrix": [2, 3], "x": 3, "y": 2 },
				{ "matrix": [2, 4], "x": 4, "y": 2 },
				{ "matrix": [2, 5], "x": 5, "y": 2 },
				{ "matrix": [2, 6], "x": 6, "y": 2 },
				{ "matrix": [2, 7], "x": 7, "y": 2 },
				{ "matrix": [2, 8], "x": 8, "y": 2 },
				{ "matrix": [2, 9], "x": 9, "y": 2 },
				{ "matrix": [2, 10], "x": 10, "y": 2 },
				{ "matrix": [2, 11], "x": 11, "y": 2 },
				{ "matrix": [3, 0], "x": 0, "y": 3 },
				{ "matrix": [3, 1], "x": 1, "y": 3 },
				{ "matrix": [3, 2], "x": 2, "y": 3 },
				{ "matrix": [3, 3], "x": 3, "y": 3 },
				{ "matrix": [3, 4], "x": 4, "y": 3 },
				{ "matrix": [3, 6], "x": 6, "y": 3 },
				{ "matrix": [3, 7], "x": 7, "y": 3 },
				{ "matrix": [3, 8], "x": 8, "y": 3 },
				{ "matrix": [3, 9], "x": 9, "y": 3 },
				{ "matrix": [3, 10], "x": 10, "y": 3 },
				{ "matrix": [3, 11], "x": 11, "y": 3 }
			]
		}
	}
}
You will see in the last row, the switch at 3,5 is removed, as there is no key there in the matrix.
If there are any bits you need to clean up, like the name and author, do so now.
The last step here is to define the pins for columns and rows. With the switch pins, the rows will be right to left.
You can use this image as reference:

For ease of wiring, I will connect the rightmost column to D3, the next to the left to D2, and continute downwards and then up the other side. Take note of these and write them into the rows and cols fields of the matrix_pins section.
keymap.c
In the vial keymap folder again, open the keymap.c. In this file, there is a section named layout_YOURLAYOUTNAME this bit must be exactly the same as the name in your info.json. Within this layout, there are rows of key codes for each column, and lines for each row. You can manually assign your base keycodes here using the QMK keycodes. The most important part is to make sure you have the same amount of keys as you have have switches in your matrix. Be sure to watch for trailing commas in this file, as well as your vial.json and info.json. The last key for each of them should not have a comma at the end.
These key codes are all redefinable in Vial, so I opt for KC_A for all them, just to get to vial as soon as possible.
config.h
Jump to the config.h in the vial keymap folder, and open a new terminal. In here, make sure your cd is your vial-qmk folder, and paste python3 util/vial_generate_keyboard_uid.py. It will spit out a line like: #define VIAL_KEYBOARD_UID {0x68, 0x96, 0x08, 0xB8, 0xFB, 0x4A, 0x8A, 0x13}. Copy this whole line and paste it into the config.h.
Some features in Vial require you to unlock the keyboard, and you set these keys with:
#define VIAL_UNLOCK_COMBO_ROWS { 0 }
#define VIAL_UNLOCK_COMBO_COLS { 0 }
I opt for using the top left key, but you could have a comma delimited list of numbers defining the rows of the keys, and the columns.
rules.mk
Okay, last file. In the vial keymap folder, open up rules.mk. Here we define a few rules for the firmware. These are all googleable terms, my go-to is:
LTO_ENABLE = yes
VIA_ENABLE = yes
VIAL_ENABLE = yes
QMK_SETTINGS = yes
TAP_DANCE_ENABLE = yes
COMBO_ENABLE = yes
Compiling #
Now you can compile your firmware with the command below.
If you named your keyboard username/keyboardname:
qmk compile lukevanlukevan/fleetline -km vial
And if you just named the keyboard alone:
qmk compile fleetline -km vial
The compiler will throw any errors, and from there googling will get you over the line, but I will outline a few common problems below.